


When our Czech Republic distributors came to our Ohio headquarters to visit, they were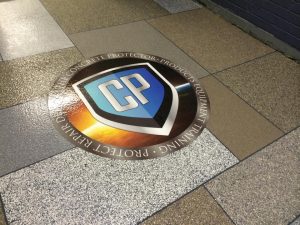 wanting to see and be involved with an actual “Graniflex Design/Logo” application. Our third floor landing next to the elevator (and entryway to some more of our offices) was an ideal location since it was one of the few spots in the building that hadn’t been coated yet.
Since we had plenty of people there to help (and because of what we were working on in other parts of the building at the same time), we did this project differently than what had should have actually been done. When necessary, I will indicate in blue any important steps and how each step should have been done if you are following along. At the very bottom of this post, I’ve written an Ideal and Best way to do a floor like this . . . be sure and follow those instructions but many of the details of how to do some of the steps are described in the following case study.
Here is a video of this project:
The process on the 3rd floor project went like this:
- Ground edges and shot-blast concrete floor.
- Swept and vacuumed well.
- Created a border around the room with ½” fiber tape. Best/preferred method: Coat the complete floor first with a Prime coat of Permaflex and then a second coat of Permaflex before taping any design.
- Found center of room by: Measuring the walls directly across from each other, finding the middle point of each wall and then running a piece of ¼” tape as a guide from side to side (the center point is the “X” in the middle of the room.
- Since we were putting down a 3 ‘ logo in the middle of the room, we measured off from center point just over 1.5” in all directions and used ¼” tape to mask around center (followed-up with 2” masking tape).
- Mixed White Permaflex with catalyst and “double accelerator” to speed up the drying process and rolled the Permaflex where logo would go and rolled a prime coat on the borders. You need to put a white base down to put the logo over to allow the colors in the logo to appear more vibrant (the logo is transparent and if going with a darker color as a base, it will affect the color of the logo).
- Mixed-up LRB/TAV combo (2 parts LRB with 1 part TAV) and put in a grout bag and used to fill a gap along the one wall/floor juncture. Used a paint brush dipped in acetone to smooth the 1” bead of LRB/TAV (always have a prime coat of Permaflex down to put a LRB/TAV mixture on).
- When the white Permaflex was dry, we laid the logo exactly where we wanted it over the white Permaflex and taped it down with 2” painter’s tape (one piece of tape at the top of the logo and another just at the bottom with each piece slightly off to the right of center). Best/preferred method: Always do at least 2 coats of Permaflex. It is best to do white Permaflex here and then to top with either clear or pigmented white Poly 85 or Graniseal. After the Poly 85 or Graniseal is set, sand to make as smooth as possible to remove any bumps or imperfections. Vacuum and solvent wipe and now you’re ready to lay your logo on this smoother surface.
Laying the Logo
- We mixed-up our Poly 85 (1 part A with 1 part B).
- Lifted left side of the logo and held it to the right .
- Rolled a thin layer of Poly 85 with a 4” mini roller on the left side over top of the white base.
- Slowly lowered the logo into the wet Poly 85 and used the roller to smooth out any air bubbles as we lowered the logo.
- Removed painter’s tape at top and bottom of logo
- Lifted up the other (right) side of the logo and rolled a thin layer of Poly 85 on the right side and slowly lowered the right side into the Poly 85 and rolled out any bubbles as it went down.
- Use the roller over the whole roller and be careful not to add too much more (if any) Poly 85 on top of the logo at this time (a more “dry” rolling is better at this time. A thick, wet topping of Poly 85 at this time will allow some pockets to occur around any imperfections (raised areas) in the floor . . . a tacky, thin layer of Poly 85 will hold the logo tighter to the floor right now.
- After an hour or so when Poly 85 was set and non-tacky, we mixed-up some more Poly 85 and rolled an even coat of it over the Logo.
Broadcasting into the borders
- Catalyzed, double accelerated, mixed and rolled gray Permaflex on the borders then broadcast 1/32” color flakes into wet Permaflex.
- Vacuumed loose flakes on border (1.5 – hours later when Permaflex was set) and put a coat of Graniseal over the border.
- 5 hours later, taped off border and logo to protect it.
- Using the same Permaflex we used on the borders (had a lid on it), we rolled a coat of it across the concrete that hasn’t been coated yet.
- When gray Permaflex was dry, we again found center of room (put a couple short guide tape lines across logo), took a 3 foot tile (which we cut to size), put a hole in the middle of the tile and lined-up the corners of the tile to match the tape guide (while matching the center hole of the tile with where the 2 pieces of guide tape meet).
- Ran ¼” fiber tape along one side of the tile (one guy lays the tape down and the other pulls it tight and tacks it down making sure it’s even along the side of the tile.
- Going the other direction, we ran another ¼” piece of stencil tape to cross the previous piece (again, make sure your line is even along the side of the tile).
- Pick the tile up, cut and remove the “guide tape”
- Now, measure off of each end of one of the first ¼” lines (we measured 3’ on each end) and ran the next piece of ¼” tape along the side of the measuring tape.
- Continue going across the floor, measuring 3’ on each end. TIP: Do all one direction first and then the other direction to make it easier for you when you pull tape.
- “Dip”and roll the same colored Permaflex (gray in this example) as you did on the base coat and roll a thin even coat of Permaflex over the floor and the tape and broadcast color flake into this wet Permaflex coat.
- When set, sweep (or use a leaf blower to blow loose flakes into a corner) and using a metal scraper, scrape the floor in one direction and then the other. Vacuum well.
- Graniseal: Mix-up 1 part A with 1 part B and roll over the surface (160 sq ft a gallon).
- When set, pull tape and clean off any loose pieces that came off of tape.
- Final coat of Graniseal at 240 sq ft a gallon.
The ideal & best way to do this floor would be:
- Find center of room and do logo first (get to the step of topping the logo with 1 coat of Poly 85).
- Mask off the logo.
- Coat the rest of the floor twice with Permaflex.
- Find center of room, put down guide tape and design diagonal tile off of it with ½” stencil tape.
- Tape out border around room with ½” stencil tape.
- “Dip & Roll” Permaflex on border (same color as base) being careful with a 4” roller along in inside of the border . . . roll right along the inside of the tape.
- Broadcast your color/size of flakes into wet border.
- Blow back loose flakes on tile side of floor.
- “Dip & Roll” Permaflex on the rest of the tile designed floor (rolling right along the inside of the tape using a 4” roller. Use 18” 3/8” nap roller on the rest of the floor.
- Broadcast your color/size of flakes into wet Permaflex.
- When Permaflex is set, blow, scrape and vacuum loose flakes
- Apply 1st coat of Graniseal.
- After Graniseal is set, pull tape and remove masking off of logo. Sand logo aggressively with 100 grit paper, clean dust and solvent wipe.
- Apply final coat of Graniseal or Poly 85 (depending on the build that you want) over the entire surface.